Learning how to attach railing to deck structures is one of the most critical steps in finishing your outdoor living space safely. Honestly, it’s the difference between a sturdy, beautiful perimeter and a wobbly safety hazard that fails inspection. Let me explain how you can get professional results while ensuring your family stays protected.
Why Getting It Right Matters Before You Attach Railing to Deck
How do you attach railing to your deck like a pro?
Attach railing to deck structures the right way, and you get a safe, good-looking finish that passes inspection. Get it wrong, and you’re looking at wobbly posts, code violations, and potential liability. Here’s the thing — most mistakes happen in the planning stage, not during installation.

Here’s a quick overview of how to attach railing to a deck:
- Check local codes — Railings are required on any deck 30 inches or more above grade. Most codes require 36–42 inch height and no more than 4-inch gaps between balusters.
- Mark post locations — Space posts no more than 6 feet apart, starting at corners.
- Cut posts to length — Account for joist height, decking thickness, and top cap.
- Secure posts to framing — Use 1/2-inch through-bolts (not lag bolts) with zinc-coated washers and nuts.
- Install bottom and top rails — Cut to fit between posts and fasten level.
- Add infill — Balusters, cable, or glass panels with no gaps larger than 4 inches.
- Finish with post caps and base covers — Protect hardware and give a clean look.
A deck railing is not just a finishing touch. It is a structural safety system that your local building department will inspect and that your family will depend on every single day.
The International Residential Code (IRC) sets the baseline — but Utah’s local jurisdictions can layer on additional requirements. Miss those, and you could be forced to tear out work you already paid for.
You know what else? A railing done right actually adds real value to your home. A railing done wrong can result in a fall, a failed inspection, or worse.
The stakes are high enough that it pays to understand every step before you pick up a drill. That is exactly what this guide covers — from planning and code compliance to post attachment, infill installation, and long-term maintenance.
I’m James Bonham, co-founder of Utah Deck Supply and a former Trex Company insider who has helped countless contractors and homeowners learn how to attach railing to deck structures safely and to code across the Wasatch Front. In the sections below, I’ll walk you through everything you need to know to get this right the first time.
Planning and Building Codes
Before you buy a single piece of lumber or a box of screws, you need to know the rules of the game. In Utah, building codes are strictly enforced to ensure safety, especially with our varying elevations and terrain. If your deck surface is 30 inches or more above the ground (grade), a guardrail is mandatory. Honestly, even if your deck is only 24 inches high, adding a railing is a smart move for peace of mind.
Here are the critical numbers you need to memorize:
- Railing Height: Most residential codes require the top of the railing to be at least 36 inches above the deck surface. Some areas or commercial applications may require 42 inches.
- The 4-Inch Sphere Rule: This is a big one. To prevent small children or pets from getting stuck or falling through, the spacing between balusters (and between the bottom rail and the deck) must be small enough that a 4-inch diameter sphere cannot pass through.
- Post Spacing: To maintain structural integrity, posts should generally be spaced no more than 6 feet apart, measured from the center of one post to the next.
- Load Requirements: Guardrails must be able to withstand a concentrated load of 200 pounds applied in any direction at the top of the rail.
When you’re Choosing Deck Railing, you have to balance these safety requirements with your home’s style. For a deeper dive into these regulations, check out our Ultimate Guide to Choosing the Perfect Deck Railing System.

Material Selection and Tools
What kind of look are you going for? At Utah Deck Supply, we see everything from traditional wood to ultra-modern glass. Here’s a quick breakdown of your options:
- Wood: Classic and cost-effective. Pressure-treated pine is common, but cedar and redwood offer natural rot resistance.
- Composite: Brands like Trex and TimberTech offer the look of wood without the sanding and staining. They are incredibly popular in Utah because they stand up well to our intense UV rays and snow.
- Aluminum: Sleek, durable, and low-maintenance. If you want a modern look that won’t rust, read our Aluminum Deck Railing Complete Guide.
- Cable and Glass: Perfect for preserving that mountain or valley view.
Regardless of the material, you’ll need the right Hardware and tools. Make sure you have a high-quality tape measure, a 4-foot level, a miter saw (or circular saw), a drill/driver with various bits, and safety gear like goggles and gloves.
Measuring and Marking to Attach Railing to Deck
Accuracy at this stage prevents a “wobbly” railing later. Start by marking your post centers. You want your posts to be evenly spaced along each run of the deck.
Let me explain: if you have a 14-foot side, don’t just put a post at each end and one in the middle. That creates two 7-foot spans, which exceeds the 6-foot safety recommendation. Instead, space four posts evenly to keep the spans under 5 feet.
Mark the exact center and sides of each post on the rim joist or floor joist using a framing square. If you are mounting to the inside of the frame, you may need to add “blocking” (extra pieces of 2x joist material) to provide a solid surface for the bolts to bite into. This is a crucial step often highlighted in guides on How to Build a Deck Railing in 10 Steps.
Step-by-Step Guide to Attach Railing to Deck
Now it’s time for the heavy lifting. The most important thing to remember when you attach railing to deck posts is that the connection between the post and the deck frame is the weakest point of the entire system.
Securing the Posts
There are a few ways to mount posts, but some are much stronger than others.
- Inside Framing (Recommended): This involves bolting the post to the inside of the rim joist. It’s the strongest method because the post is braced by the deck’s internal structure.
- Fascia Mount: The post is attached to the outside face of the rim joist. This saves deck space but requires very heavy-duty hardware to prevent the rim joist from pulling away.
- Surface Mount: Using metal base plates to “sit” the post on top of the decking. This is common for aluminum or composite systems but requires solid blocking underneath the deck boards.
- Notched Posts: You might see older decks with 4×4 posts notched to fit over the rim joist. Stop right there. Modern codes generally discourage or forbid notching because it significantly weakens the post.
For a secure fit, use 1/2-inch diameter hot-dipped galvanized through-bolts (also called carriage bolts) with nuts and large washers. Never use lag bolts for this connection; they can pull out over time as the wood shrinks and expands. Drill your pilot holes slightly larger than the bolt diameter for a snug fit. If you’re using a specific system, follow a Step-by-Step Guide to Installing Your Trex Railing to ensure you don’t void the warranty.
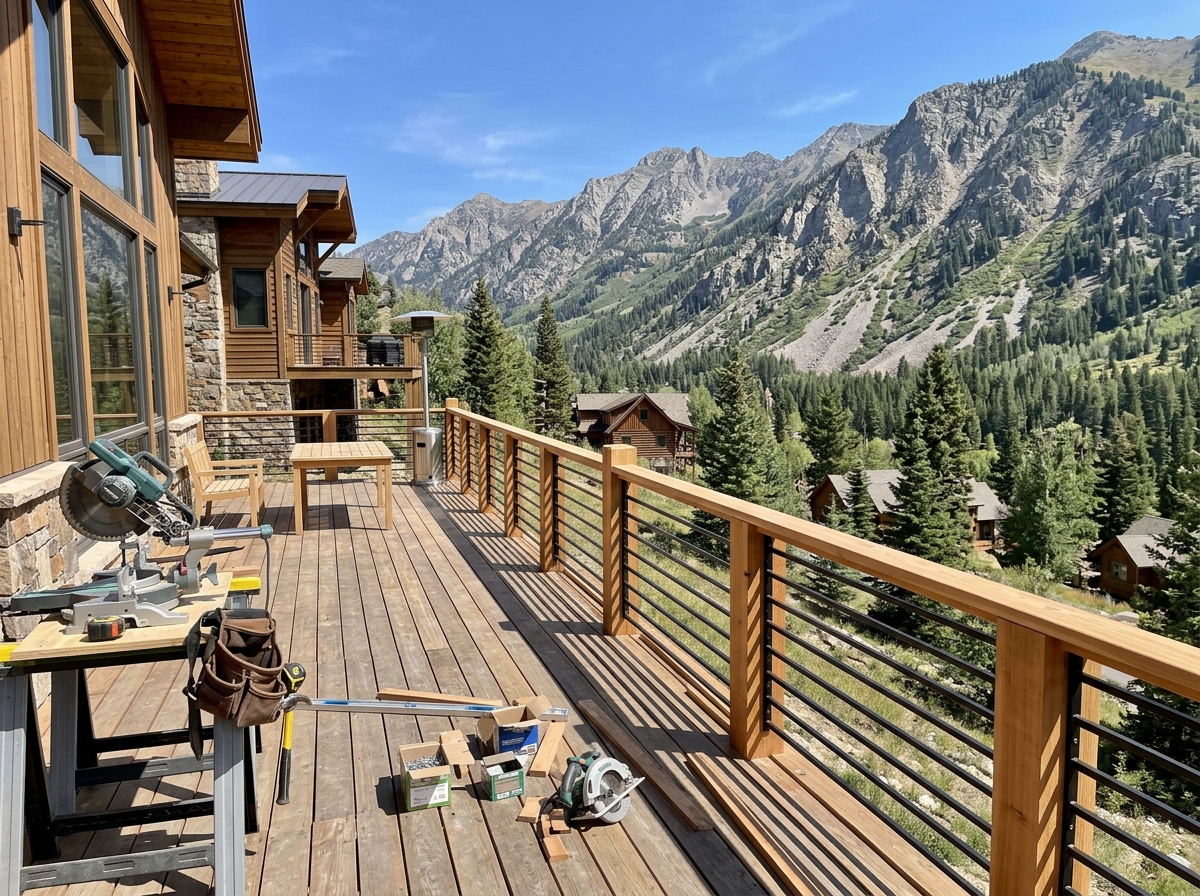
Installing Rails and Infill
Once your posts are plumb (perfectly vertical) and bolted down, you can install the rails.
- Bottom Rail: Measure the distance between posts at the deck level. Cut your rail 1/4 inch shorter to allow for brackets. Use spacers (usually 2-3 inches high) to hold the bottom rail off the deck while you fasten it. This allows for easy cleaning and prevents rot.
- Top Rail: Repeat the measurement at the top of the posts. Ensure the top rail is level before securing.
- Infill: This is what fills the “gap.” Whether you choose balusters, cable, or glass, the 4-inch rule applies.
| Infill Type | Pros | Cons |
|---|---|---|
| Traditional Balusters | Cost-effective, classic look | Can obstruct views, more cleaning |
| Cable Railing | Modern, nearly invisible views | Higher cost, requires tensioning |
| Glass Panels | Ultimate view, wind protection | Expensive, requires frequent cleaning |
If you want to maximize your Utah mountain views, check out our guide to Elevate Your Space: The Ultimate Guide to Cable Railing Systems.
How to Attach Railing to Deck Near the House
What happens when the railing meets the siding? You have two choices: install a post a few inches away from the house, or attach the railing directly to the structure.
If you attach to the house, you must find the structural sheathing or studs behind the siding. Use specialized mounting brackets and, if you’re dealing with brick or stone, use masonry anchors. It’s vital to ensure this connection is watertight to prevent rot in your home’s walls. For more details, see How to Attach a Deck Railing to a House.
Maintenance and Pro Tips for Success
You’ve done the hard work, but a deck in Utah faces some of the harshest weather in the country. From scorching 100-degree days in St. George to heavy snow in Logan, your railing takes a beating.
- Post Caps and Skirts: These aren’t just for looks. Post caps protect the end grain of wood posts from water infiltration, and skirts hide the hardware while keeping debris out of the mounting holes.
- Check Bolt Tightness: Wood shrinks as it dries. Every six months, grab a wrench and ensure those carriage bolts are still snug.
- Sealant: If you went with a Timber Railing, apply a high-quality UV-resistant sealer every 1–2 years.
- Composite Care: For Trex Railing Products, a simple wash with soap and water is usually all you need.
Common Mistakes to Avoid
We’ve seen it all at our showroom. Avoid these common DIY pitfalls:
- Overtightening: Don’t crush the wood fibers when tightening bolts; it actually reduces the holding power.
- Using the Wrong Screws: Always use fasteners rated for pressure-treated lumber (stainless steel or hot-dipped galvanized). Standard screws will corrode and fail.
- Skipping End-Cut Sealer: When you cut pressure-treated wood, you expose the untreated interior. Apply a sealer to every cut to prevent internal rot.
Essential Safety Gear Checklist:
- Impact-resistant safety glasses
- Work gloves (especially when handling treated lumber)
- Dust mask or respirator when cutting
- Sturdy, closed-toe boots
You know what? Taking the time to properly maintain your hardware and check for wood shrinkage every six months is the best way to ensure your deck remains a safe haven for years to come. If you have questions about specific span charts or the best composite materials for the Utah climate, our experts are ready to help. Give us a call at 385-993-5492 or Request a Free Quote today to get your project started.