A lot of deck projects hit the same point. The framing plan is coming together, the wood species is picked, and then the question shifts from boards to details: does the surface stay clean and screw-free, or does it get face-fastened the traditional way?
For many Utah homeowners and builders, that decision isn't only about looks. It's about bare feet on a hot day, snow melt in winter, long-term board movement, and whether one damaged board can be replaced later without turning a simple repair into a partial teardown. Hidden deck fasteners for wood can absolutely produce a better-looking finished deck. The right system can also help with spacing and board control. But some systems are much easier to live with than others once the deck has been through several seasons on the Wasatch Front.
The Appeal of a Flawless Deck Surface
The cleanest-looking wood decks usually have one thing in common. From standing height, the eye sees wood grain, board lines, and color variation. It doesn't stop on rows of screw heads.
That matters more than commonly anticipated. A deck surface without exposed fasteners feels more finished, especially on premium hardwoods or narrow board profiles where surface hardware can visually dominate the field. It also avoids the rough spots that can show up over time around face fasteners, especially when wood cycles through dry heat, snow, and spring moisture.
Why the surface matters in daily use
A screw-free top surface changes both appearance and foot-feel. Families notice it when kids are barefoot. Contractors notice it when a deck is meant to match a higher-end exterior with cable railing, metal accents, or a cleaner modern layout.
Hidden systems also aren't some niche upgrade anymore. Hidden deck fastener systems for wood decking became widely adopted in North America during the early 2000s, with usage on new residential wood deck projects growing from around 12–15% in 2005 to roughly 30–35% by 2015 as grooved board compatibility became more standardized, according to this concealed fastener adoption overview.
A hidden system makes the deck read like finished carpentry instead of exposed jobsite fastening.
For anyone planning around grooved material, board choice and fastener choice converge. A good starting point is a practical guide to grooved decking so the board profile and fastening method are matched before material is ordered.
They fit best when the project goal is a premium finished surface, especially on:
- Visible entertainment areas where the deck is close to patio doors, outdoor dining space, or railing sightlines.
- Hardwood or premium wood layouts where exposed fasteners can interrupt the look of the boards.
- Projects with consistent board layout because clip-based systems reward good planning, accurate joist placement, and steady spacing.
They're less compelling when the deck is purely utility space, the boards are standard square-edge stock with no groove strategy, or future board replacement is likely to be frequent.
Choosing Your Hidden Fastener System
Not all hidden systems work the same way. Some rely on pre-grooved edges and clips between boards. Some conceal the fastening through the side of the board. Others use a plug or trim approach to hide a visible fastening point after the board is secured. Each solves a different problem.
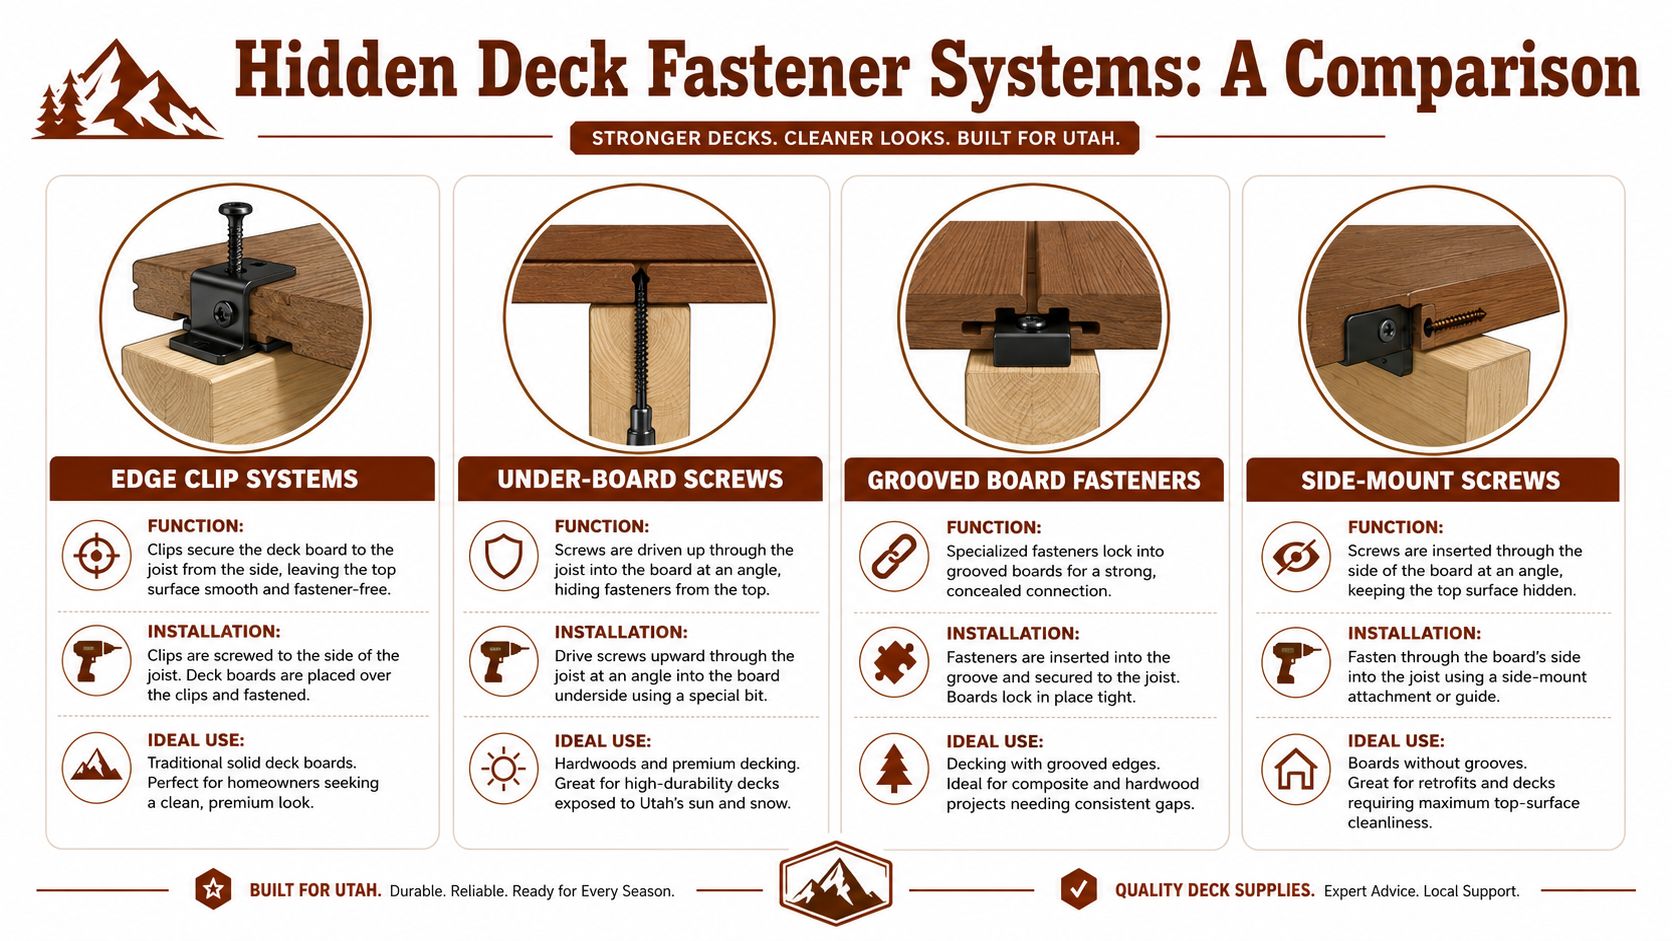
The main categories
Groove clip systems are the most recognizable option. A clip sits in the edge groove and fastens into the joist, leaving the board face untouched. These are usually the easiest fit for pre-grooved boards and are often the cleanest visually.
Edge-fastening systems drive a fastener through the edge or near the edge of the board so the top stays clean. These can work well when the goal is a concealed look without relying entirely on a standard clip profile.
Plug-style concealed fastening isn't technically invisible during installation, but the finished surface can still look very clean. The board is fastened, then a wood plug or matching cap covers the entry point. This is often the practical answer for perimeter boards, stairs, picture-frame details, and final boards where clips alone won't solve the layout.
Under-board or specialty mount systems are more situational. They can produce a very refined result, but they usually demand more planning, more precise framing, and more labor.
For anyone comparing categories beyond the basics, this deck hardware complete guide helps connect fastener style to the rest of the deck package.
Hidden Deck Fastener System Comparison
| System Type | Best For | Pros | Cons |
|---|---|---|---|
| Groove clip systems | Pre-grooved wood boards and clean field decking | Very clean surface, consistent spacing, efficient board alignment | Requires compatible grooved boards, some repairs can be harder later |
| Edge-fastening systems | Wood decks where the top must stay clean without a typical clip layout | Good appearance, can suit certain wood profiles well | More technique-sensitive, not universal across all board shapes |
| Plug-style concealed fastening | Borders, stairs, breaker boards, final boards, repair zones | Strong hold, good service access, useful where clips don't fit well | Not a fully clip-based install, more visible labor steps |
| Specialty under-board systems | Premium layouts with careful planning | Minimal surface interruption, refined finish | More complex installation, less forgiving in the field |
What usually works best
For most wood deck fields, groove clip systems are the straightforward choice when the boards are designed for them. They keep the layout clean, support even spacing, and simplify repeat fastening across the joists.
Plug-style concealed fastening usually earns its place at transitions and edge conditions. Most experienced builders don't force a clip-only approach into every part of the deck. They mix methods where needed.
Field rule: the best hidden system is the one that handles the center boards cleanly and still gives a workable plan for starts, stops, stairs, and repairs.
What doesn't work is choosing a fastener first and hoping it fits the lumber package later. With wood, the board profile and moisture behavior always get a vote.
Matching Fasteners to Wood Boards and Materials
A hidden fastener system only works if it matches the board you are installing on the frame. I see plenty of Utah projects get off track here. The homeowner likes the clean top surface, the contractor orders beautiful wood, and then everyone realizes the board profile and the fastening plan do not line up.
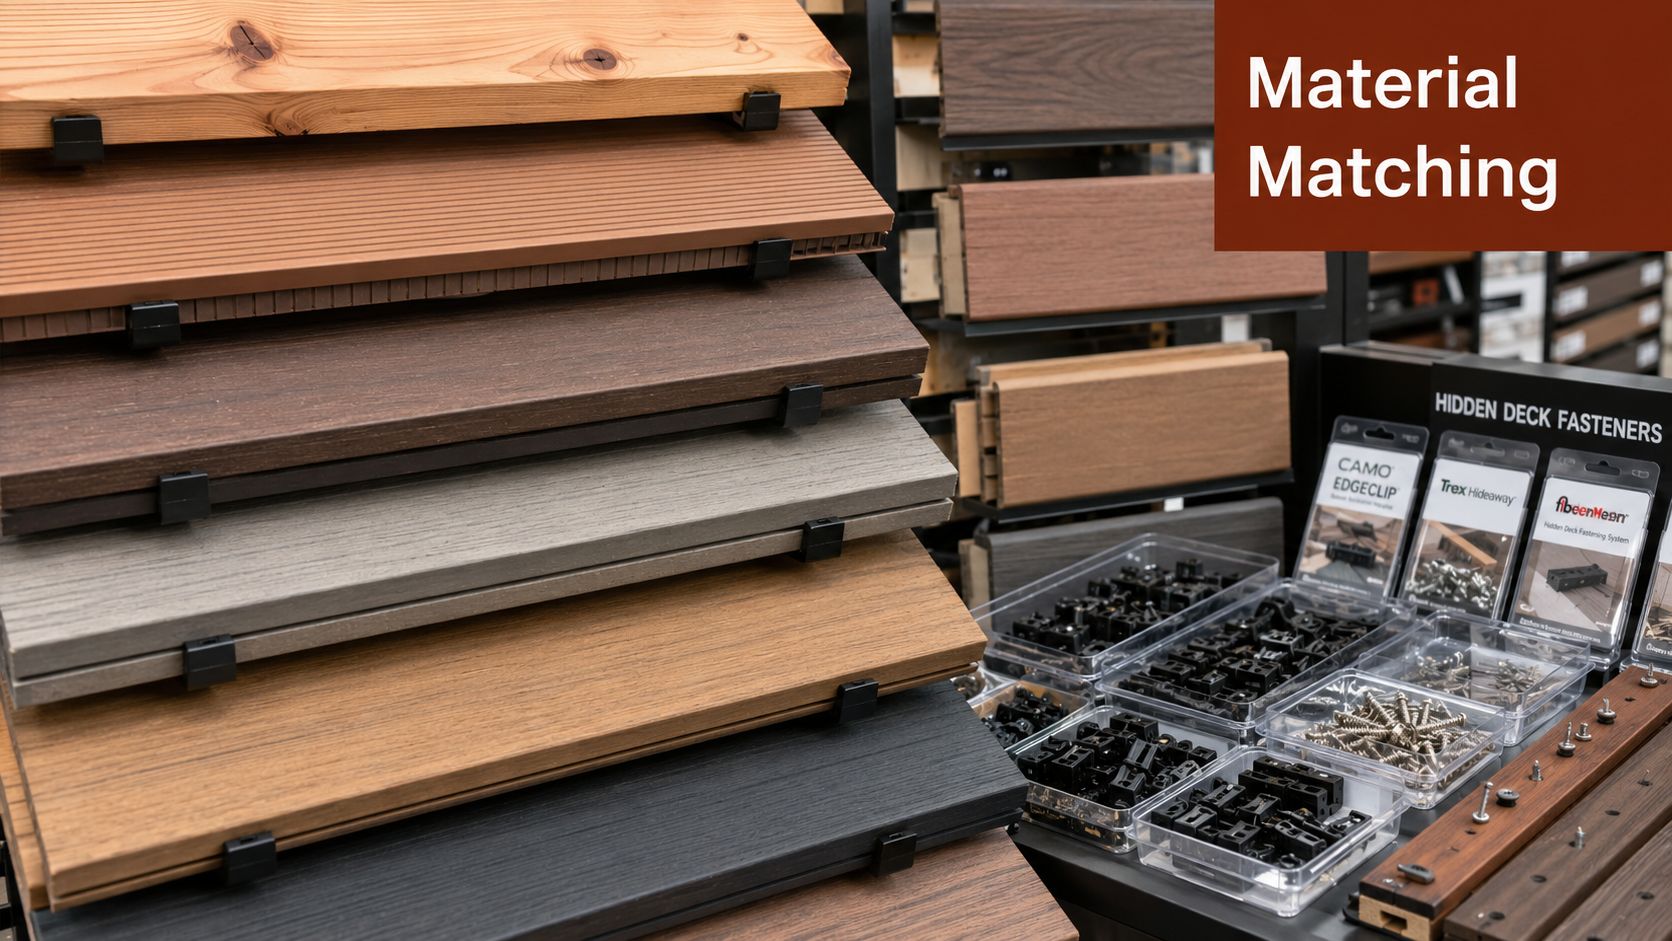
Start with the board shape
Board profile decides a lot. Hidden deck clips are made for grooved boards. If the edge is square, a standard clip has nothing to grab.
Square-edge boards can still be installed with a clean-looking surface, but the plan changes. In the field, that usually means one of three paths:
- Route a groove if the species, board dimensions, and installer skill make that practical.
- Use an edge-fastening system built for square-edge stock.
- Mix fastening methods so the main deck area, borders, picture frames, and last boards each get the method that fits.
That decision should happen before the lumber order, not after delivery. Matching the fastener plan to the deck lumber package keeps you out of jobsite improvisation, especially with hardwoods and treated boards that do not forgive mistakes.
Match the fastener to the wood
Wood species matter as much as board shape.
Dense hardwoods hold differently than treated softwoods. A clip that performs well in a softer board may not seat the same way in a harder one. Groove quality, screw bite, and how much pressure it takes to bring boards into line all change with the species. On some hardwood jobs, installers need more preplanning, more careful handling, and less forcing. If you rush it, you can damage the groove before the deck is even finished.
Face fastening can still be the right answer in some areas, but hidden edge fastening has a real advantage on wood boards that are prone to checking or surface splitting. You avoid driving repeated fasteners through the face, which reduces one common source of visible cracking around screw locations. That is a practical benefit I have seen matter more on premium wood decks, where appearance is one of the main reasons people chose the material in the first place.
Moisture movement matters too. In Utah, boards can dry hard in summer, then take on snow and ice exposure in winter. Some species stay more stable than others, and some hidden systems handle seasonal movement better because they allow consistent spacing without over-constraining the board. That does not mean every clip system is equal. It means the board and the fastener need to be treated as one system.
Don't overlook fastener material
The metal matters. Utah's freeze-thaw cycles, snow, irrigation overspray, and treatment chemicals can shorten the life of the wrong fastener fast.
Stainless steel is usually the safer choice for long-term exterior wood decks, especially in exposed locations or with corrosive wood treatments. Coated hardware can work in the right application, but only if the coating and base metal are rated for the wood species and site conditions. Saving a little on fasteners is rarely worth it if the hardware stains the boards or corrodes before the deck is halfway through its service life.
Use this checklist before you buy:
- Board profile: Grooved, square-edge, or a mix of both
- Wood species: Dense hardwood, treated softwood, cedar, redwood, or another exterior wood
- Fastener type: Clip, edge fastener, plug system, or a combination
- Fastener metal: Appropriate for exterior exposure and compatible with the wood
- Repair plan: Can a damaged board be removed later without tearing apart a large section of the deck
That last point gets skipped in a lot of guides. It should not. A hidden fastener system can look great on day one and still be a poor fit if replacing one cracked or damaged board becomes a major teardown five Utah winters later.
Installation Basics and Required Tools
Start with a real jobsite problem. A hidden fastener install goes smoothly when the frame is flat, the joists are consistent, and the first board is dead straight. If the framing is crowned, wavy, or out of square, the clips will not hide that work. They will telegraph it across the whole deck surface.
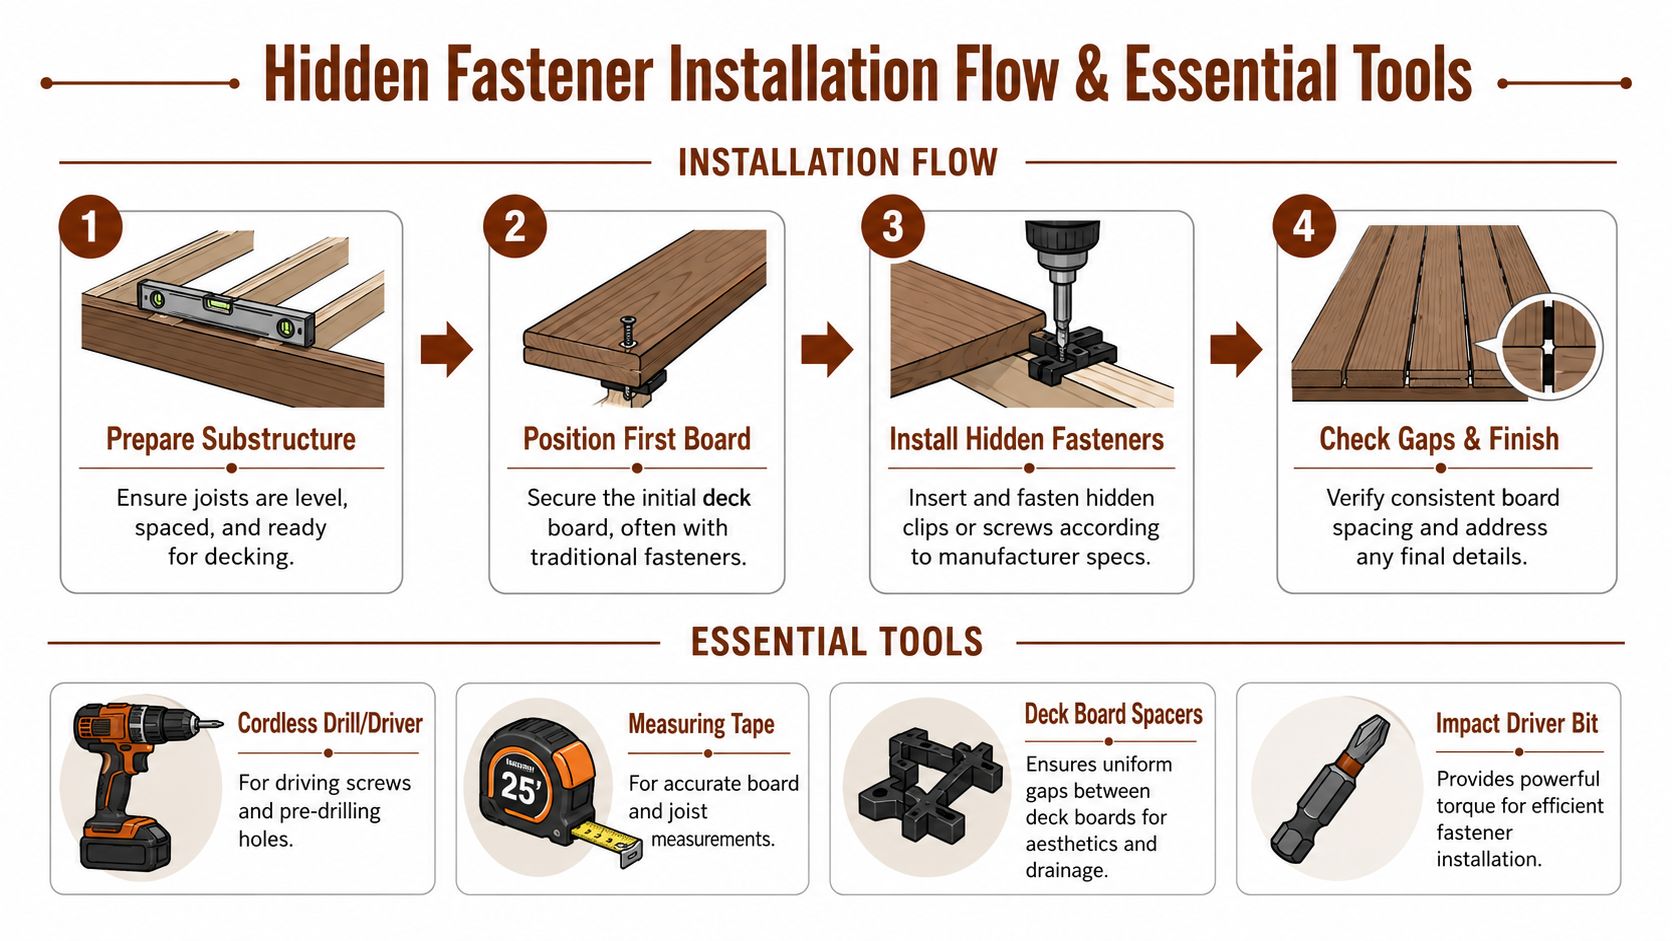
The basic sequence
Most hidden systems follow the same job flow, even if the hardware changes.
Prepare the framing
Check joist spacing, plane high spots, and correct any twist before decking starts. Hidden fasteners install faster on a clean frame. They install slower on a frame that forces every board into place.Secure the starter board
The first board controls the run. Get that line right and the rest of the field is easier to keep straight. Miss it early and the error keeps showing up row after row.Install clips or edge fasteners row by row
Set the board, seat it fully, fasten it, then check alignment before moving on. Clip systems often reduce layout fuss because spacing is built into the hardware, but they still need steady pressure and consistent seating.Handle the ending details
Perimeter boards, picture-frame borders, stairs, and breaker boards usually need a different fastening method than the main field. Plan those transitions before the last few rows, not after.
Grooved boards are the cleanest fit for clip systems because the hardware locks into the board edge and keeps the surface free of visible screw heads. In the field, many installers find clip systems move along well once the setup is right, especially on large runs where repeated face-screw layout would take more time.
The tools that matter
You do not need a trailer full of specialty gear. You do need the right few tools, and you need them set up correctly.
- Impact driver or drill/driver: Consistent drive depth matters. Overdriving can distort clips or pull boards too tight.
- Manufacturer-specific bit or guide: Some systems depend on a dedicated bit, stop, or installation jig.
- Layout and measuring tools: Chalk line, square, tape, and a long straightedge help catch small errors before they spread.
- Board seating tools: A pull bar, clamp, or board bender helps bring stubborn boards into position without forcing the clip.
- Router or groove-cutting setup: Useful if part of the job uses square-edge wood that needs to be grooved on site.
For visible transitions, stair parts, repairs, or the last board at the house, many projects still need screws for deck boards even when the main field uses hidden hardware.
Hidden fasteners reward patience at the start.
Common installation mistakes
The usual problems are small at first. Then they stack up.
- Uneven joists put clips and boards under stress before weather ever hits the deck.
- Boards not fully seated leave slight spacing and height inconsistencies that become obvious by the middle of the run.
- No plan for the last board leads to awkward visible fastening in a spot everyone sees.
- Forcing tight boards together can create binding, which matters on wood decks that will move through Utah's dry periods and seasonal moisture swings.
- Skipping future access planning makes one damaged board much harder to remove later.
Manufacturer instructions and local code still control the details. The practical rule is simple. Hidden hardware works best when the frame is right, the board profile matches the system, and the installer has already thought through how the field, borders, stairs, and future repairs will be handled.
Utah Climate Considerations and Long Term Maintenance
A deck in Utah can look perfect in June and start showing stress after one winter if the fasteners were the weak point. Sun bakes the boards, dry air shrinks them, snow sits in the gaps, and tracked-in de-icing salts can stay on the surface longer than people expect.
Corrosion matters more than people think
I see this mistake a lot at the counter. The homeowner spends good money on quality decking, then treats the hidden fastener as a minor accessory choice. On many Utah jobs, it is not minor.
If the deck sees meltwater, snow pileup, or de-icing salt exposure, corrosion resistance needs real attention. Stainless fasteners are the safer call in those conditions, especially in harsher locations or on projects where long service life matters. Standard coated or lower-grade metal can hold up for a while, then start staining wood, weakening clips, or creating failures that are hard to spot until boards loosen.
The right metal also depends on the board. Some wood species and preservative treatments are harder on fasteners than others. That is one reason it helps to request a deck materials quote before ordering. The best clip for a dry, covered backyard deck is not always the best clip for a shaded deck that holds snow and moisture.
The maintenance trade-off most guides skip
Hidden fasteners give you the clean surface people want. The trade-off is service access later.
That matters more in Utah than many national guides admit. Boards move here. Dry summers can shrink wood. Seasonal moisture and snow can swell it back. A board that cups, splits, or gets damaged in the middle of the field is much easier to deal with if the fastening plan allowed for future removal.
Some systems handle repairs reasonably well. Others can turn one bad board into a partial tear-out because adjacent boards and clips lock everything together. That does not make hidden fasteners a bad choice. It means the clean look needs to be weighed against repair labor, especially on larger decks, stairs, and any area where a single damaged board will be expensive to reach.
A few habits help over the long haul:
- Use more serviceable details in problem areas: Perimeter boards, stair treads, and boards near grills, hot tubs, or heavy traffic often deserve a fastening method that is easier to repair later.
- Keep leftover clips and screws: Matching older hidden hardware years later is not always simple.
- Write down the exact system used: That saves time when a contractor has to open the deck for a repair.
- Check drainage and debris buildup: Pine needles, leaves, and packed snow hold moisture around clips and joists longer than they should.
- Plan board replacement before the first board goes down: A small access strategy on day one can save a lot of labor later.
The best hidden fastener setup for Utah is usually the one that balances appearance, corrosion resistance, and repairability. Clean lines are great. A deck that can still be maintained without tearing half the field apart is better.
DIY or Pro and Where to Get Your Supplies
A hidden-fastener deck can go smoothly for a DIY builder, then get expensive fast if the framing is out of plane or the board layout was not thought through before the first course. I see that a lot with Utah projects. The homeowner buys good boards and good clips, but the install still fights them because the deck was treated like a basic face-screw job.
The deciding factor is usually not effort. It is tolerance for precision and correction.
DIY makes sense on a simple rectangular deck with consistent framing, full access, and a board profile that clearly matches the hidden fastening system. If you are comfortable checking joist alignment, setting clean spacing, and adjusting as you go, a careful DIY install can turn out well.
Professional installation makes more sense when the project has stairs, breaker boards, picture-frame borders, multiple elevations, older framing, or a mixed plan that uses hidden fasteners in some areas and face screws in others. Those details affect how the deck looks on day one and how hard it is to service later. In Utah, that matters. Snow load, summer heat, and dry-season movement tend to expose weak layout decisions.
A hybrid approach works well too. Some homeowners handle board selection, fastening strategy, and material takeoff, then hire out the install or just the tricky sections.
Repair planning should be part of the DIY-or-pro decision from the start. Hidden fasteners give you a clean surface, but some systems also make one damaged field board harder to remove without opening adjacent rows. That is manageable if the fastening plan accounted for it. It is a headache if nobody thought about future access around stairs, borders, grills, or high-traffic areas.
Before you buy materials one piece at a time, build the whole fastening package together. That means boards, clips, screws, joist tape, starter hardware, and any face-fastened areas that need to match the rest of the deck. If you want help sorting that out, request a deck materials quote.
Utah Deck Supply works with homeowners, DIY builders, remodelers, and contractors across West Jordan, Salt Lake City, South Jordan, Sandy, Draper, Herriman, Lehi, Ogden, Provo, and the Wasatch Front. The West Jordan showroom is set up for practical side-by-side decisions, including wood-compatible hidden fasteners, deck screws, railing, framing hardware, joist protection, lighting, and shade-structure materials. For help building a supply list, call 385-993-5492.