DIY wood pavilion projects are one of the most satisfying ways to upgrade your backyard, especially when you want a space that’s both beautiful and genuinely useful. Done right, your pavilion becomes the hub for family gatherings, quiet mornings, and summer nights under the Utah sky. You know what? With a clear plan and the right materials, this is absolutely within reach for most motivated homeowners.
Quick Answer: How to Build a DIY Wood Pavilion
Building a DIY wood pavilion is one of the most rewarding outdoor projects you can tackle as a homeowner. It transforms your backyard into a functional, beautiful space for entertaining, relaxing, and enjoying Utah’s gorgeous weather—all while saving thousands on labor costs compared to hiring a contractor.
Three main approaches to building your DIY wood pavilion:
- Pre-Cut Pavilion Kits – Pre-engineered components arrive ready to assemble in 1-2 days (easiest, fastest)
- Building from Plans – Follow detailed blueprints using materials you source yourself (moderate skill, 1-2 weeks)
- Custom Design – Work with suppliers to create a unique structure (highest skill, flexible timeline)
Essential steps for all approaches:
- Obtain permits (required for most structures over 200 sq. ft.)
- Prepare foundation with concrete footers below frost line (30+ inches in Utah)
- Set posts plumb and secure with braces
- Install beams, rafters, and roof decking
- Apply protective stain or sealant
Typical costs and timelines:
| Approach | Material Cost | Build Time | Skill Level |
|---|---|---|---|
| Pre-Cut Kit | $5,500-$12,000 | 1-2 days | Beginner |
| From Plans | $3,000-$7,500 | 1-2 weeks | Intermediate |
| Custom Build | $5,000-$15,000+ | 2-8 weeks | Advanced |
Here’s the thing—whether you’re a seasoned contractor or a motivated weekend warrior, the key to a successful DIY wood pavilion is having the right materials and expert guidance when you need it. As James Bonham, co-founder of Utah Deck Supply, I’ve helped hundreds of builders steer everything from material selection to code compliance, and I’m here to guide you through building a DIY wood pavilion that will stand strong for decades in Utah’s demanding climate. Let me explain exactly how to approach this project so you can create an outdoor space you’ll love.
 Pre-Cut Pavilion Kit from Utah Deck Supply with timeline of 1-2 days, cost range of five thousand to twelve thousand dollars, and beginner skill level; 2) Building from Plans using Utah Deck Supply materials with timeline of 1-2 weeks, cost range of three thousand to seventy-five hundred dollars, and intermediate skill level; 3) Custom Design with Utah Deck Supply expert consultation showing timeline of 2-8 weeks, cost range of five thousand to fifteen thousand plus dollars, and advanced skill level, with icons representing tools, calendar, and dollar signs for each pathway - DIY wood pavilion infographic")
Essential DIY wood pavilion terms:
DIY wood pavilion builds don’t just add shade—they create a true outdoor room where memories are made and weekends suddenly feel like mini getaways. Honestly, if you’ve ever looked at your backyard and thought, “This could be so much more,” a pavilion is one of the smartest upgrades you can tackle yourself. Let me explain why this project delivers such a big return on effort.
Introduction to Your DIY Wood Pavilion Project

Ever dream of turning your backyard into a true retreat? A DIY wood pavilion creates a beautiful, shaded space for family gatherings and quiet mornings, all while saving money and giving you something to be proud of. Honestly, the benefits are huge!
- Cost Savings: By doing the labor yourself, you can save nearly half the cost of a professional installation. That’s thousands of dollars back in your pocket.
- Personal Satisfaction: There’s nothing like admiring a structure you built with your own hands. It’s a tangible accomplishment that improves your home and lifestyle.
- Improved Outdoor Living: A pavilion transforms an ordinary yard into an extraordinary outdoor room, providing shade and shelter for entertaining, dining, or relaxing.
- Skill Development: This project is a fantastic way to sharpen your woodworking and construction skills with step-by-step guidance.
- Increased Property Value: A well-built pavilion is a smart long-term investment that adds significant value to your home.
This guide will cover everything from planning to the final nail, ensuring you can build a stunning DIY wood pavilion right here in Utah.
When you’re serious about building a DIY wood pavilion, planning is where real-world experience matters most. Rushing this step can cost you extra time, money, and frustration—so slowing down here actually speeds everything up later. Here’s the thing: a clear blueprint lets you move through the build with confidence instead of second-guessing every cut.
The Ultimate Blueprint for Your DIY Wood Pavilion
Before you pick up a single tool, let’s talk about planning. Honestly, this is the secret sauce for a smooth, successful build—saving you from headaches and costly mistakes. Let me explain the key decisions you’ll make first.
Kits, Plans, or Custom: Which DIY Wood Pavilion Path is for You?
When starting your DIY wood pavilion journey, you have three primary paths, each with its own advantages.
-
Utah Deck Supply Pavilion Kits (Easiest): This is the fastest route. Our pre-cut, labeled kits shorten build times to just a few days, eliminating complex joinery cuts. It’s the perfect balance of DIY satisfaction and professional precision.
- Advantages: Speed, precision, all materials included, expert support.
- Considerations: Less design flexibility than a custom build.
-
Building from Plans (Intermediate): If you enjoy cutting your own lumber but want a proven design, this is a great choice. You can find many free plans online for various sizes. Bring us your materials list, and we’ll help you source high-quality lumber and hardware.
- Advantages: More customization, satisfaction of building from raw materials.
- Considerations: Requires more tools, time, and woodworking experience.
-
Custom Design (Advanced): For those with a unique vision, we can help you plan a custom DIY wood pavilion. We provide the materials and expert advice; you provide the labor and design flair. This is where our in-person guidance on materials, codes, and climate considerations truly shines.
- Advantages: Unlimited design flexibility, perfect fit for your space.
- Considerations: Highest skill level required, longer planning and build time.
Here’s a quick overview of how these options stack up:
| Approach | Average Material Cost | Typical Timeline | Required Skill Level |
|---|---|---|---|
| Utah Deck Supply Pavilion Kits | $5,500 – $12,000 | 1-2 Days | Beginner |
| Building from Plans (with Utah Deck Supply materials) | $3,000 – $7,500 | 1-2 Weeks | Intermediate |
| Customizing a Kit (with Utah Deck Supply’s expert help) | $5,000 – $15,000+ | 2-8 Weeks | Advanced |
Essential Materials and Tools for the Build
Getting the right materials and tools is crucial. Here’s what you’ll need to build a DIY wood pavilion.

Required Tools:
- Cutting & Measuring: Circular saw, miter saw, tape measure, framing square, level.
- Assembly: Cordless drill/impact driver, hammer, socket set, C-clamps, ladders.
- Foundation: Post hole digger, hammer drill (for concrete), concrete drill bit.
- Finishing: Sander, paintbrush, utility knife.
- Safety Gear: Always wear safety glasses, gloves, hearing protection, and sturdy boots.
Material Selection:
The wood you choose impacts the durability, look, and cost of your pavilion. For more details, see our guide on Choosing the Right Wood for Your Dream Deck.
- Cedar: Naturally resistant to rot and insects, it weathers to an attractive silver-gray. It’s an excellent, long-lasting choice. Our Cedar Pavilion Kits are a popular option.
- Douglas Fir: Offers an exceptional strength-to-weight ratio and accepts stains beautifully, making it a robust option for timber framing.
- Pressure-Treated Lumber: The most affordable option, it’s chemically treated to resist rot and insects, making it a durable choice for outdoor structures.
For roofing, asphalt shingles are common, but a metal roof offers a classic look and improved durability.
Hardware and Fasteners:
Don’t skimp on quality here! Use galvanized structural screws and heavy-duty bolts for strong, corrosion-resistant connections. We recommend using stand-off post bases rather than sinking posts directly into concrete to prevent rot. Check out our Deck Hardware Complete Guide for more info.
Before digging, address two critical areas: permits and site preparation.
Local Building Codes and Permits:
This is paramount! In Utah, most pavilions require a permit, especially if they are over 200 sq. ft. Regulations on setbacks and height vary by city, so always check with your local building department before you start. You can also reference the International Code Council (ICC) for general building standards. At Utah Deck Supply, we offer in-person guidance on codes to help you steer this process.
Site Selection and Preparation:
- Choose Size & Location: Decide the pavilion’s purpose (dining, lounging) to determine its size. Consider sun exposure, wind, and proximity to utilities.
- Level the Area: The building area must be flat. Clear and level the spot with a shovel or sod cutter.
- Lay Out the Footprint: Use batter boards and string to mark the perimeter and post locations. This ensures your pavilion is perfectly square.
Foundation Options:
A solid foundation is key.
- Individual Concrete Footers: This is the recommended method. It gives each post its own foundation below the frost line (30+ inches in Utah) to prevent heaving.
- Full Concrete Slab: This offers maximum stability and a finished floor. If you choose this, thicken the slab under the posts for extra support.
By the time you reach the build phase of your DIY wood pavilion, you’ve already done the hard mental work—now you get the satisfaction of seeing everything come together in real life. Honestly, this is where most homeowners start to feel proud of what they’re creating, step by step. Let me explain how to move through construction safely and efficiently so your pavilion looks pro-built and lasts for decades.
Construction Phase: Bringing Your Pavilion to Life
With your plan in hand and materials ready, it’s time for the fun part—the build! We’ll break this down into three manageable stages. Remember to prioritize safety, measure twice, and enjoy the process.
Step 1: Building the Foundation for Your DIY Wood Pavilion
A solid base ensures your DIY wood pavilion stands strong for years.

- Square the Layout: Use batter boards and string to lay out the footprint. Apply the 3-4-5 rule to every corner and measure the diagonals to ensure they are equal and your layout is perfectly square.
- Dig and Pour Footers: Dig holes for your posts below Utah’s frost line (30+ inches deep). Use tube forms (Sonotubes) for neatness, pour the concrete, and level the top.
- Set Post Bases: We highly recommend setting metal post anchors in the wet concrete. This keeps the wood off the ground, preventing rot and ensuring stability.
- Set and Brace Posts: Once the concrete cures, attach your main posts (e.g., 6×6 lumber) to the anchors. Use a long level to make sure each post is perfectly plumb, then secure them with temporary braces.
- Assemble Beams and Plates: Cut your top plates and beams to length. Fit them to the posts, ensuring they are level, and secure them with galvanized structural screws or heavy-duty bolts.
- Install Corner Braces: Cut and fit 45-degree braces at the corners. These are critical for lateral stability and rigidity.
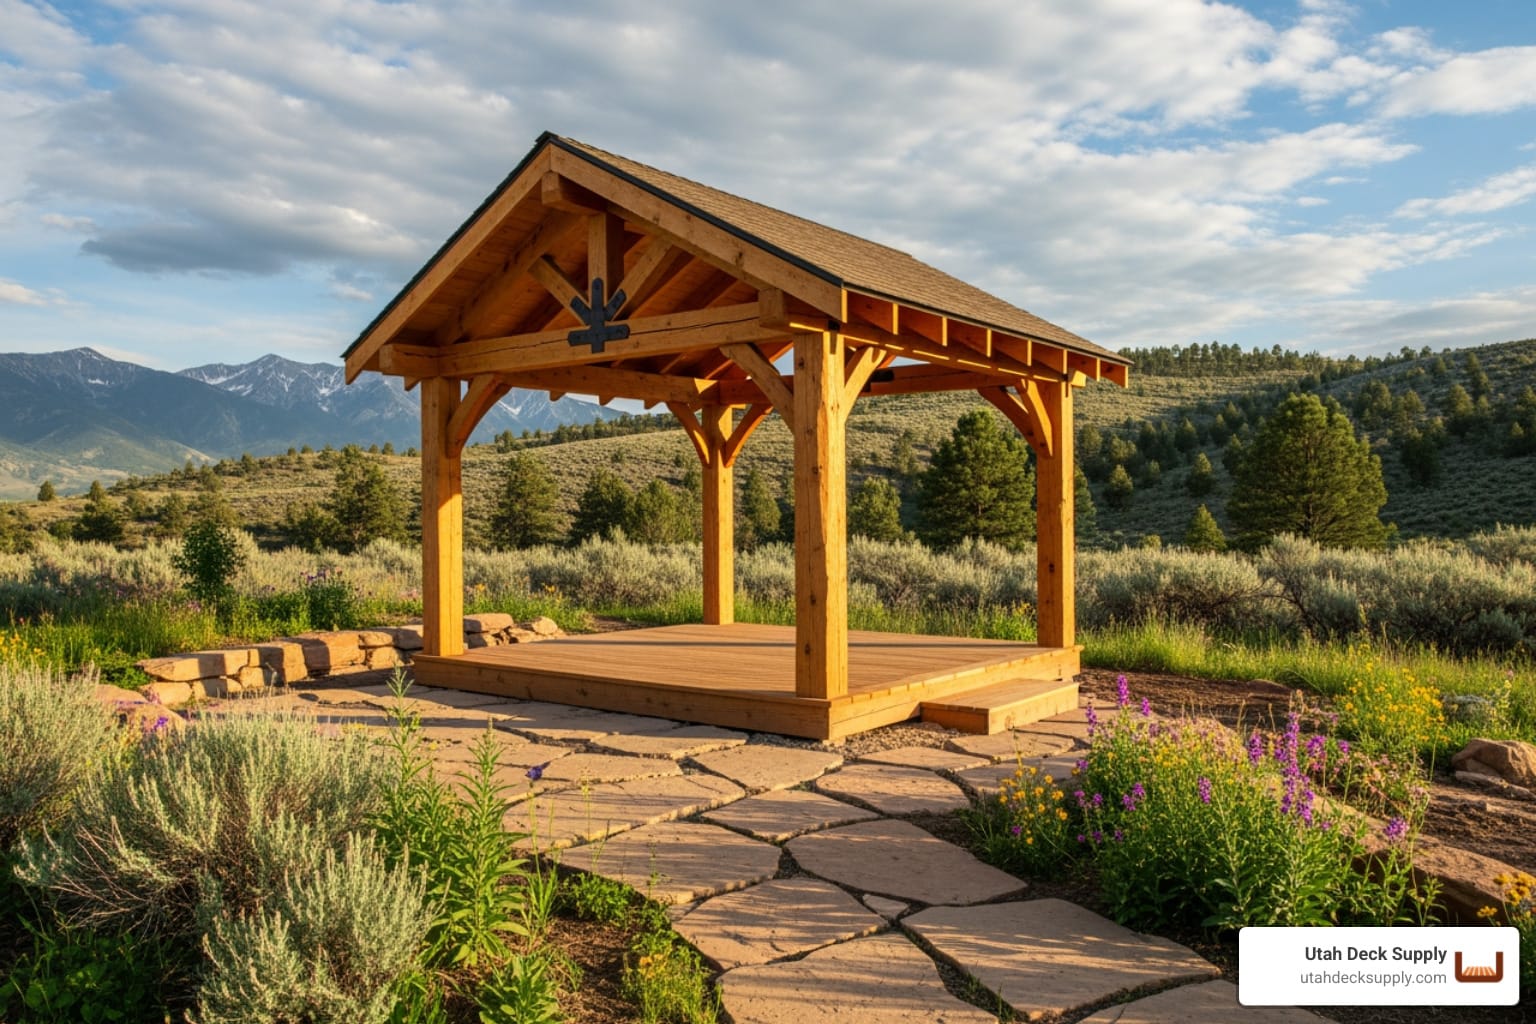
Step 2: Constructing the Roof
The roof crowns your pavilion and really makes it take shape.
- Choose a Roof Style: Common options include the classic A-frame Gable Roof, the four-sided Hip Roof (great for wind resistance), or a simple single-slope Lean-to Roof.
- Install the Ridge Beam: This is the highest horizontal beam. Secure it with post-to-beam connectors or traditional timber frame joinery.
- Cut and Place Rafters: Cut your rafters according to your roof pitch. Make “bird’s-mouth” notches so they sit securely on the top plates. Install them at a consistent spacing (e.g., 24 inches on center).
- Attach Roof Decking: Fasten your roof decking (e.g., OSB or 5/4 cedar) to the rafters. For a beautiful finished ceiling, consider using tongue-and-groove boards on the underside.
- Install Roofing: Lay down roofing felt, then install your chosen material, like asphalt shingles, cedar shingles, or a durable metal roof. Ensure proper overlap to prevent leaks.
Step 3: Finishing Touches and Long-Term Maintenance
Congratulations, the structure is up! Now it’s time to protect your investment and add personal touches.
- Protect the Wood: Applying a high-quality stain or sealer is non-negotiable in Utah’s climate. It protects against UV damage and moisture. For best results, pre-stain all components before assembly. Learn more about Deck Staining and Finishing.
- Customize Your Space: Make it your own! Add string lights, a ceiling fan for hot summers, privacy walls, or even built-in seating. Any electrical work should be done by a licensed electrician.
- Long-Term Maintenance: Periodically inspect your pavilion for loose fasteners or wear. As wood settles, you may need to tighten bolts after a few months. Plan to reapply sealer every 2-5 years to maintain protection. For more tips, see our guide on Deck Maintenance.
If you’re feeling excited—and maybe a little unsure about the next step—that’s completely normal when taking on a serious DIY wood pavilion project. You don’t have to figure it all out alone. For all the high-quality lumber, hardware, and expert advice you need to get it done right, check out our full range of gazebo and pavilion kits, call us at 385-993-5492, or Request a Free Quote to get a personalized materials plan for your project.