
You're standing on a deck layout with a tape measure in one hand and a parts list in the other, trying to figure out whether the order needs a few boxes or a whole pallet. That question, how many deck fasteners do I need, has no single universal answer because the count changes with the deck system, the framing, and the details that online calculators often flatten into one number.
Why Deck Fastener Counts Are Not One Formula
Ledger fasteners and decking-board fasteners do different jobs, so a takeoff has to count them separately. The ledger connection ties the deck to the house, and the International Residential Code has required 1/2-inch bolts or lag screws for ledger-to-house connections in every edition since 2009. The spacing schedule in the IRC-based table changes with span, from 30 inches on center to 10 inches on center for the longest spans, and the total depends on joist span, ledger length, fastener type, and installation details (ICC guidance).
Structural fasteners and surface fasteners solve different problems
Board fasteners hold the walking surface in place. Their quantity comes from board-to-joist intersections, so a longer run across more joists increases the count even if the deck area stays the same. That is why ledger hardware belongs in one bucket and deck-board screws or clips belong in another.
A ledger takeoff belongs in one bucket. Deck-board screws, hidden clips, starter pieces, plugs, and color-matched trim fasteners belong in another. Hidden systems also follow the decking brand and profile, while face-screwed boards change with board width, edge treatment, and the spacing pattern under the deck.
Practical rule: start with the connection type before you start with deck size. If the fastener attaches the deck to the house, use the ledger table. If it attaches decking to framing, count intersections.
A clean parts list separates structural connectors, such as ledger bolts, lag screws, and other framing hardware, from surface fasteners that depend on the decking system and layout. That split keeps the order closer to the job and avoids mixing house connection hardware with board fastening counts.
Joist Spacing, Material, and Layout: What Drives the Fastener Count
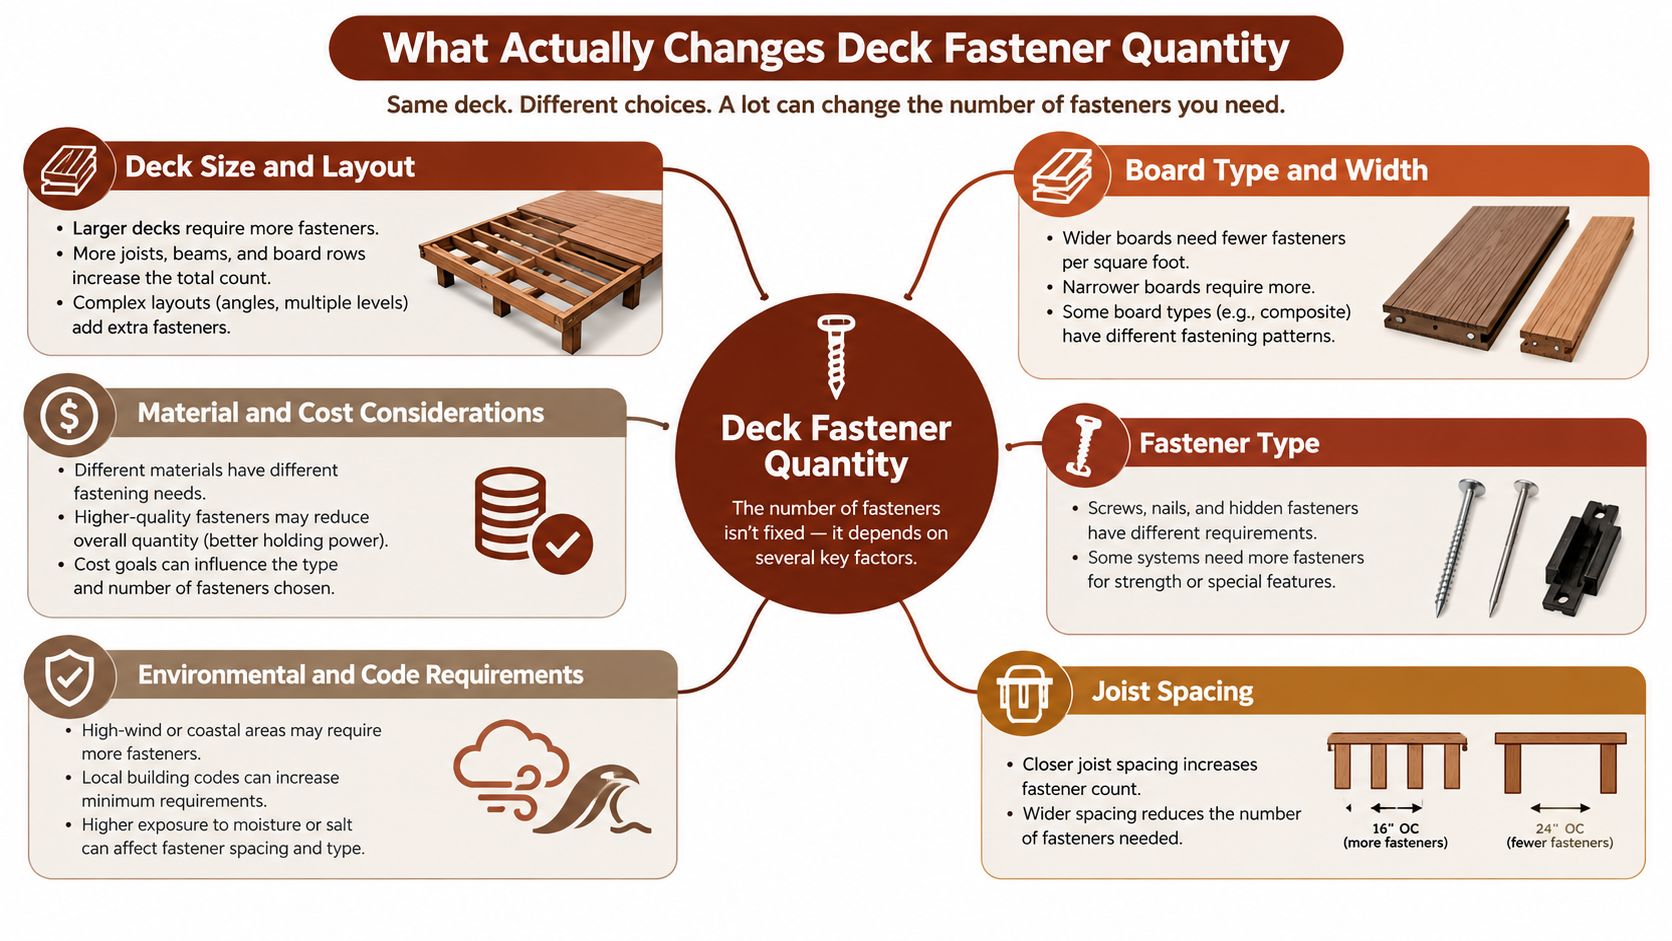
A deck's fastener count starts with joist spacing because every board picks up fasteners where it crosses framing. Wider spacing means fewer intersections across the same span, while tighter spacing raises the count before the first board is cut. Material matters just as much. A hidden-fastener system and a face-screwed wood deck use different hardware, and manufacturer instructions can override a generic rule whenever the board profile or clip system calls for it.
Layout details add fasteners outside the main field
Borders, stairs, and diagonals change the takeoff fast. Picture-frame edges use starter and finish pieces, stair treads create extra runs and end conditions, and diagonal layouts often force framing decisions that increase intersections or require closer spacing. Fascia and band-joist attachment also add fasteners outside the deck surface, so a square-foot estimate alone undercounts the order.
Fastener compatibility matters as much as count. A screw can be the right length and still be the wrong choice if the coating or metal does not match treated lumber or the site's exposure.
Corrosion resistance changes the count because the wrong fastener is not usable at all. For treated wood, county guidance calls for stainless-steel, hot-dipped-galvanized, or otherwise approved fasteners, so the quantity math comes after the material choice, not before it. The same applies near edges, perimeters, and stairs, where local code and product instructions often add pieces that a simple area estimate misses (Skagit County deck construction guidance).
How to Calculate Board-to-Joist Fasteners
Board-to-joist takeoff starts with intersections, not square footage. Count how many joists each board crosses, then multiply by the fasteners required at each crossing for that specific deck system. For a simple face-screwed deck, that's straightforward. For hidden clips, the same intersection count still applies, but the hardware changes.
A practical rectangular-deck example
A deck with 12 board runs that each cross 10 joists creates 120 board-to-joist intersections. If the selected system uses two fasteners at each intersection, the field count is 240 fasteners before borders, stairs, cutoffs, plugs, or waste. If the layout adds trimmed ends or replacement pieces, those go on top of the field count, not inside it.
The same method works whether the project is wood, composite, or PVC. The board profile changes the hardware family, but the arithmetic still follows the actual crossings. For surface screws, a local product page for deck screws is the right place to sort out compatible length, head style, and drive type before the order is finalized.
Count the board, count the joist lines, then count the fasteners per crossing. Anything else turns into guesswork fast.
Hidden systems need a separate check for starter clips, field clips, and finish clips. Face-fastened systems need screw count, plug count if the board is plugged, and any extra pieces for perimeter details. That's why a fastener takeoff works best when each family gets its own line item instead of forcing every deck into one formula.
Hidden Clips vs Face Screws by Brand
A grooved composite deck and a square-edge PVC deck do not buy hardware the same way. Hidden-clip systems fasten at each joist crossing, while face-screw systems depend on screw count, plug count if the board is plugged, and the board profile the manufacturer allows. That is why the takeoff changes as soon as the brand and edge detail are set.
Trex's installation guidance for face-fastened boards calls for two screws at every joist, boards spanning at least three joists, and fasteners installed generally at a 90-degree angle and flush with the surface (Trex installation guidance). The same brand-specific approach applies to hidden systems. Starter pieces, finish pieces, and edge conditions come from the board line's own instructions, not from a generic deck count.
If you are pricing hidden deck fasteners, start with the exact board profile first. Grooved boards usually point to clips, while square-edge boards point to surface screws, and some layouts need both at different edges of the same deck.
| Fastener Family | Typical Attachment | Quantity Driver | Common Waste Note |
|---|---|---|---|
| Hidden clips | Grooved composite or PVC boards | One clip at each joist crossing, plus starters and ends | Extra clips usually come from cuts, border pieces, and damaged parts |
| Face screws | Square-edge wood or approved composite boards | Screws per joist crossing, often two at each support | Plugged boards need extra plugs and replacement screws |
| Starter and finish clips | First and last board courses | Perimeter length and layout | Corners, picture-frame borders, and stairs raise the count |
| Color-matched screws | Exposed surface fasteners | Board surface and field layout | Keep a small surplus for cutoffs and misdriven screws |
The mistake is using one board-to-joist number for every system. Hidden clips, face screws, and starter hardware do not follow the same ordering pattern, and the brand instructions decide what can be used. A clean takeoff keeps each fastener family separate so the order matches the deck build instead of a generic calculator.
Adding Borders, Stairs, and Diagonals
A framed edge changes the takeoff fast. Picture-frame borders add corner conditions, starter and finish hardware, and more cut ends to account for, so the count can move even when the main deck area stays the same. Stair treads are separate board runs, and each tread needs its own joist crossings counted from the layout.
For a framed edge instead of a plain perimeter, see our guide on how to plan picture frame borders before you lock the clip count.
Don't leave perimeter hardware out of the takeoff
Fascia fastening belongs on the list, not in the margin. Band-joist and rim-joist details can add hardware beyond the walking surface, and deck connection guidance calls for attachment at 6 inches on center on the band joist, with separate rim-joist fastening requirements (Skagit County deck construction guidance). A clean area count can still miss that perimeter hardware.
Diagonal layouts need their own count because the board path changes the number of crossings and can push the framing closer together. That affects visible fasteners and hidden clips alike. Final board direction should be set before the fastener takeoff is locked, then the edge, stair, and fascia hardware should be counted separately from the field.
Joist Spacing Effects on Fastener Counts
Joist spacing changes the fastener count before the first screw is ordered. Tight framing puts more support lines under each board, so the same deck surface needs more clips or face screws. Wider spacing lowers the count only when the decking system allows it.
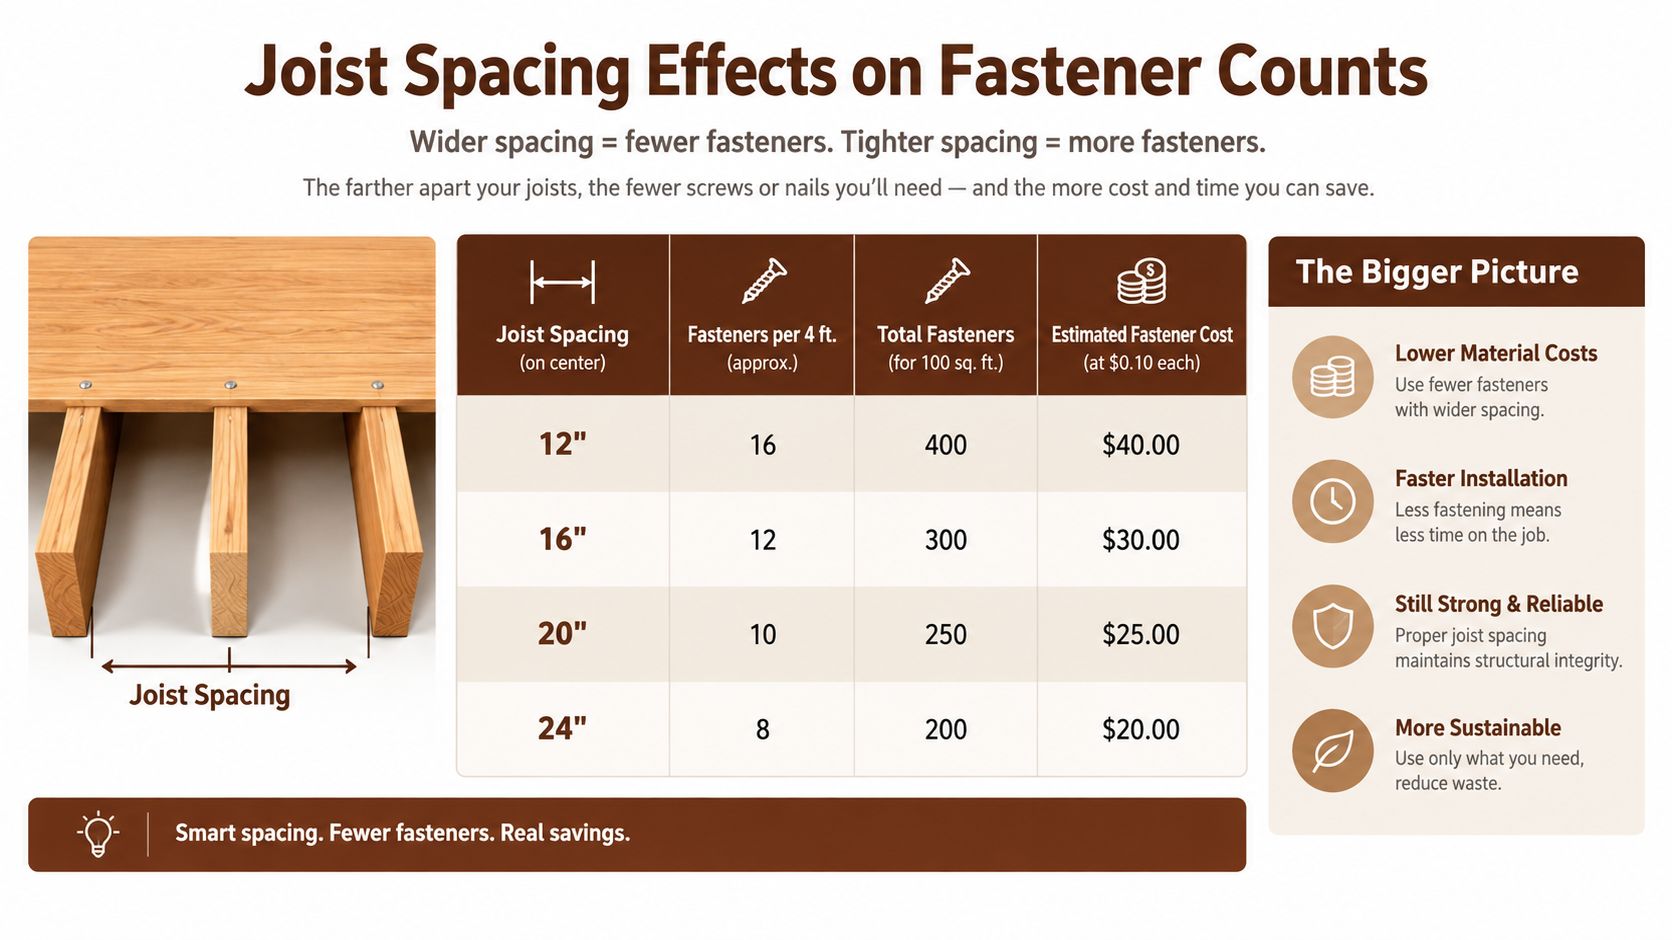
Trex's installation guide ties joist spacing to the product chart and requires boards to span at least three joists (Trex installation guide). A deck framed at 16 inches on center has more joist lines across the same width than one framed at 24 inches on center, so the fastening count rises with framing density even when the footprint stays the same. Count the support lines under each run directly, not from deck area alone.
Waste allowance should follow layout, not habit
Waste belongs on top of the measured takeoff, but the extra amount depends on the layout. Cutoffs, starter pieces, border details, stairs, and replacement boards all create different waste patterns. A small rectangular field may need little extra material, while a picture-framed or diagonal layout usually creates more offcuts that do not line up the same way.
Utah Deck Supply uses a project-by-project approach to joist spacing because the deck system controls the fastener path. That is the right order of operations for materials buying too: count the actual support lines, then add the hardware tied to the chosen profile and layout.
Fastener Takeoff Worksheet and Checklist
A worksheet keeps the order honest because it forces each hardware family into its own line. That matters on Utah jobs, where a contractor may need a blend of screws, hidden clips, plugs, and structural connectors for one project. A clean estimate starts with the board run count and ends with the separate perimeter and framing items.
Copyable worksheet fields
- Decking brand and profile: Record whether the boards are wood, composite, or PVC, then note grooved or square-edge.
- Board runs: List the number of boards in the main field, plus borders and stair treads.
- Joist crossings per board: Count the actual support lines under each run.
- Fasteners per crossing: Enter the manufacturer-required count for clips or screws.
- Starter and finish clips: Add separate quantities for the first and last course if the system uses them.
- Borders and picture frames: Count perimeter hardware apart from the field.
- Stairs and fascia: Record step pieces, fascia fasteners, and any cut-edge needs.
- Plugs or color-matched trim pieces: Add these only when the system requires them.
- Waste allowance: Add a manufacturer- or layout-based surplus for damaged or misplaced fasteners.
A takeoff platform like Exayard construction takeoff platform can help organize the numbers, but the hardware still has to be matched to the deck system. The useful part is the structure, not the shortcut.
Checklist: confirm deck direction, joist spacing, border style, stair count, and whether the board is grooved or square-edge before any cart is built.
For a local materials review, the Utah Deck Supply showroom is the kind of stop that helps when the worksheet is complete but the hardware list still needs a second look.
Verification Table for Fastener Families
A deck can look straightforward on paper and still miss the mark at the fastener stage. The mismatch usually starts with the board profile, then the substrate, then the coating or connector detail. Composite, PVC, and treated wood do not all accept the same hardware, so the safest takeoff starts with the fastener family and the guide that controls it.
| Fastener Family | Compatible Board Profile | Substrate and Exposure Notes | Primary Manufacturer Source |
|---|---|---|---|
| Ledger bolts and lag screws | Structural ledger connection | House attachment, treated wood compatibility, local code review required | ICC ledger guidance |
| Face screws for wood decking | Square-edge wood decking | Use approved corrosion-resistant fasteners for treated lumber | Minnesota deck guidance |
| Hidden clips | Grooved composite or PVC boards | Must match board groove, starter layout, and joist spacing | Trex installation guide |
| Decking screws | Face-fastened wood or approved composite boards | Head style, coating, and drive bit must fit the board system | Trex installation guide |
| Structural deck connectors | Framing and ledger hardware | Joist span, band joist, and local code details drive the selection | AWC deck connection guidance |
A ledger bolt is a structural fastener, not a board fastener, and it belongs in a different count. Hidden clips are tied to the board groove and the exact layout, while decking screws depend on the board material, the head style, and the manufacturer's approved pattern. Structural connectors follow framing demands, so they should be checked on the framing side of the takeoff, not lumped into the decking line item.
Fastener checks belong in the order review before anything is delivered to the jobsite. That avoids returns, keeps the install moving, and prevents a mismatch when the deck includes treated lumber, a perimeter border, or a clip pattern that only works with one board system. Manufacturer instructions still override generic estimating rules when they conflict.
Next Steps for Utah Deck Builders
A solid takeoff separates board fasteners from ledger hardware, then adds the details that usually get missed. The fastest way to finish the list is to bring the worksheet, the board profile, and the joist spacing to a supplier that works with deck materials every day. For planning help, ai deck design can be a useful starting point before the hardware list is finalized.
Utah homeowners and contractors who want the order checked can use the worksheet to sort clips, screws, plugs, and framing connectors before visiting West Jordan. Utah Deck Supply is set up for that kind of materials review across the Wasatch Front, with decking, railing, and deck hardware matched to the project rather than a one-size-fits-all box count.
If the fastener list is still in progress, Utah Deck Supply can help turn the worksheet into a material order for composite decking, PVC decking, hidden fasteners, screws, and framing hardware. Call 385-993-5492 or request a deck materials quote to compare the hardware against the board profile before anything gets ordered.